The Secret to Drawing White Fur that Stands Out on White Paper
- catrinmemberyart
- Apr 28
- 4 min read
First of all, it doesn't make a lot of sense that we're able to draw white... on white paper... using COLOURED pencils, does it?
I've lost count of the number of times pet owners have told me that I can't draw their cat/dog/horse because they have white fur. And I understand why they think that, because like I said, it doesn't make sense... but I can because I never actually draw white.
There is an argument as to whether white is a colour or not. In science, white is what our eyes see when all wavelengths of the visible colour spectrum are combined (Tanya Kelley PhD, 2026). This means when something appears to be white, it's because it reflects all of the colours from light, rather than absorbing them.
Because of this, white often isn't considered a true colour, because technically it's the absence of all colours.
This info helps so much with my coloured pencil drawings, knowing that white is a result of coloured reflections helps to understand the value in adding hints of colour like yellow, green, pink, and blue into white fur to create a drawing that stands out.
I find this especially obvious to see when looking at photos of white animals sitting outside on the grass. The blue skies, combined with a huge field of green grass create the best reflections.

Take this photo of my dog, Loki, for example.
If you look closely and zoom in to his fur, you'll notice subtle hints of green in his fur, mostly in the shadows where I've circled.
You'll also see where the light is hitting his fur and creating that extra bright white colour, there is a slight blue hint to it.
When it comes to drawing white fur, don't be afraid to add these extra colours, after all, if you just begin using a white pencil, it won't show on the paper unfortunately.
Although if it did, white animals would be a lot easier to draw wouldn't they?!
Adding these pale colours that reflect in the white fur are great for making your drawing stand out on the paper.
One thing to just be careful of when adding these extra colours is not to add too much.
If you have pale, almost pastel coloured pencils, they will be great for white fur. Otherwise, choose the lightest version of blue/green/pink etc that you have, and use a very light pressure to add the colour.
You can do this by holding your pencil closer to the end (instead of the nib) and using your wrist to gently add colour. With this option, I would suggest adding a light layer of white pencil underneath, so that each colour has a lighter base to sit on top of.
To learn more about base layers - take a look at my YouTube video How to create smooth coloured pencil drawings for realistic fur
As part of the video, I explain how your base layers (the coloured pencils used underneath the final details) affect the colours added on top.
In addition to using a range of light colours, your grey pencils will do a lot of the heavy lifting when it comes to drawing detail in fur strokes and fur direction.
I like to add light greys to add bits of detail into the highlights, then darker greys and sometimes browns into the shadows.
One thing I find about drawing white fur is that it's often always so much darker than we think. Have you ever heard the phrase "draw what you see and not what you think you see"? That's especially true for white animals.
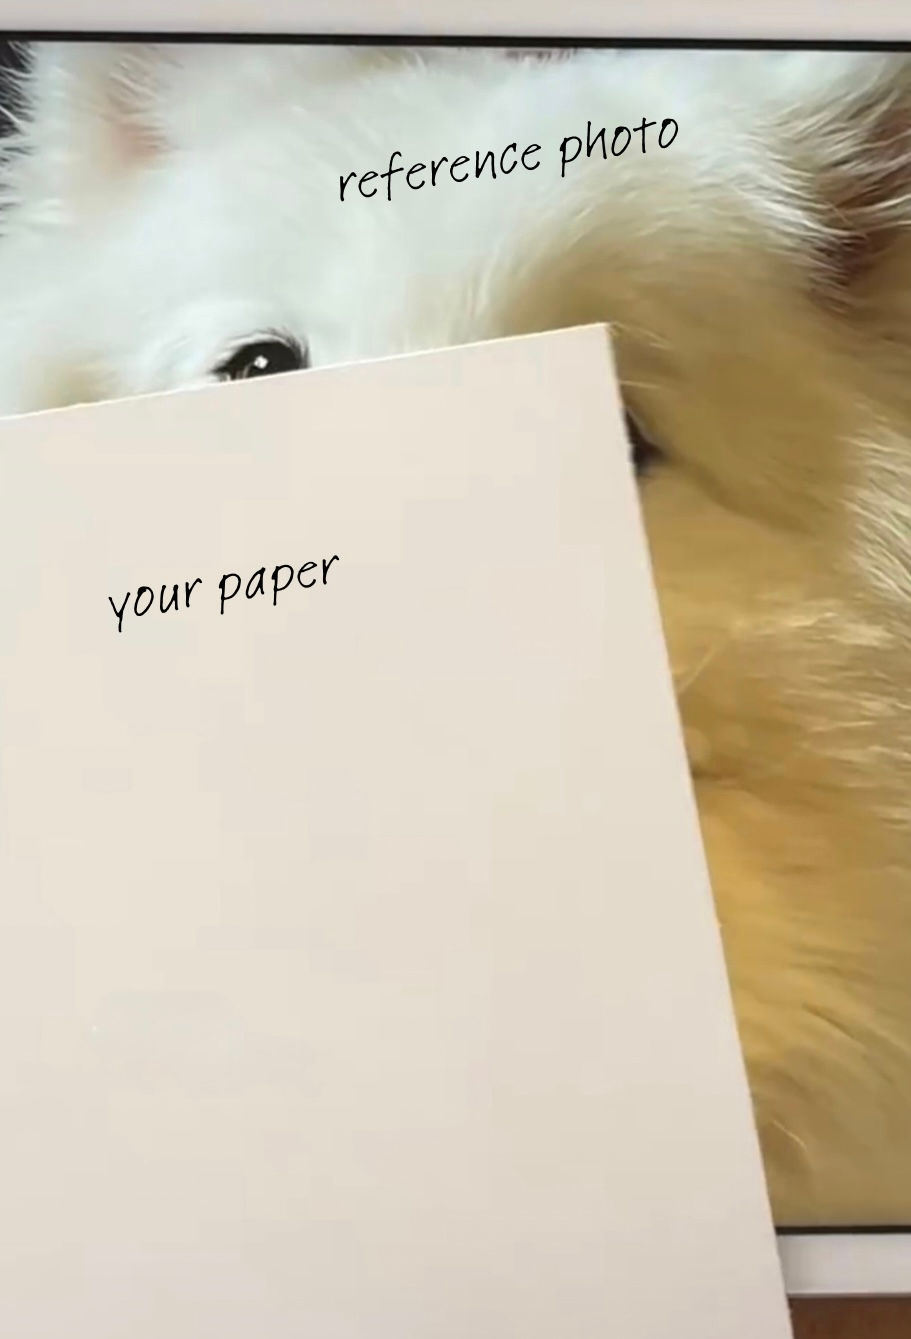
A trick you can use to see just how dark the fur really is, is to hold a piece of your paper up against the photo you're drawing from, whether it be a print or on a screen. This allows you to see a direct comparison between the fur colour and your paper colour.
Without doing this, or zooming into just small sections at a time, our brain sees the whole photo, making the animal appear a lot lighter than it really is because we have more context of its surroundings.
When drawing white animals I like to add their eyes and nose as some of the first areas I work on. These will often be the darkest areas of the whole drawing, the eyes, particularly the eyelids are always a dark brown/grey/black colour. Then even if the dog has a lighter coloured nose like brown or pink, their nostrils will always need a dark, almost black coloured pencil.
By drawing the eyes and nose in at the beginning, you get a great reference point for how dark you can actually go with your shadows and your highlights.
Without drawing the darkest sections, any colour you add will immediately look way too dark.
My final advice would be to work slowly, one layer at a time, and don't press too hard with your pencil (at least not straight away!)
By gradually building up the colour, it becomes easy to adjust as you go, if you need to make an area lighter you can, and if you need to make an area darker you can.
I'm currently working on the ultimate coloured pencil for pet portraits course... I've filmed a number of tutorials for it already where I go into a lot more depth, explaining step-by-step, and the exact coloured pencils I use to draw realistic white fur.
For early access & discounts when Pet Portraits : Your Guide to Realistic Pencil Drawings goes live, make sure you sign up here
Follow Catrin Membery - Pet Portrait Artist
Click here to sign up for free coloured pencil tips and guides like this one straight to your inbox!


Comments